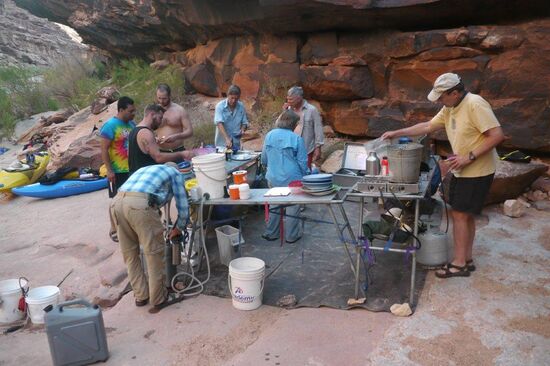
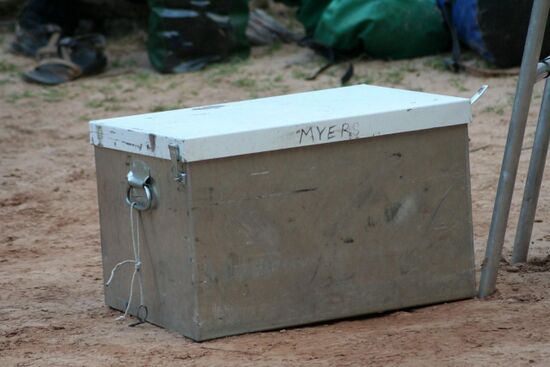
The Kitchen
This chapter includes info on ice/iceless cooking, gear needed and how to pack it, cook crews including couples and re-assigning crews, kitchen set up and take down, stoves, and other information like how much propane is required for various trip lengths.
Ice or No Ice
For starters, the trip will have to decide if there will be ice or no ice trip. How is this possible you ask? Well, multiday desert backpacking uses no ice, so multiday river trips can leave the ice at home as well. The difference will be in the types of food consumed, food preperation, the weight of the boat and the need to make sure coolers with ice stay out of the sun, are opened infrequently and drained often.
The stove
Some folks bring back-up stoves in case the main one breaks down. Better to understand how yours works, bring any essential replaceable parts e.g. o-rings and the tools to fit them and to clean sand out the jets. Explain to everyone that taking a stove off a boat and putting it on the sand is a bad idea. Always put it on a table, a rock or something solid then the burners will keep burning and no futzing will be needed. Encourage the clean up crew to wipe out the stove when they clean the prep tables. Switch off propane at the tank when you close down the kitchen each night so you don't run out.
For a good discussion of how to assign cook crews, see Cooking Assignments.
Washing dishes
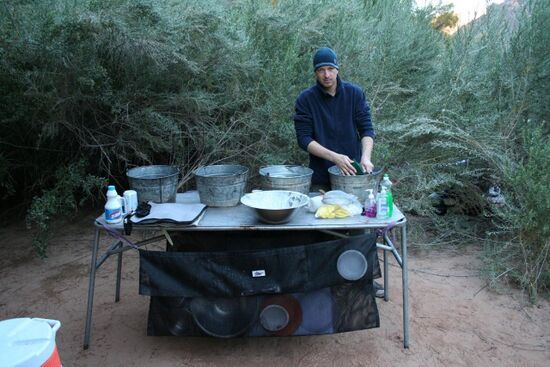
First, decide where to set up for washing dishes. It is best below the high water line which will also make it easier to fill the buckets and then empty them when done. Some trips like to always set up the buckets going downstream or upstream so it is easy to figure out where to start.
The Park Service recommends a four bucket system.
- Cold river water rinse
- Hot soapy river water
- Hot river water rinse
- Chlorinated cold river water rinse
Many trips like to use a Blaster to heat up the river water for the two middle buckets. The Blaster is fast at heating up water but it uses a lot of propane (see below) and also is just another thing to bring. What works well instead is that when the cook crew is taking the last item off the stove to remind them to put a large pan of river water on the stove. Be careful to avoid getting sand in the stove. The wash water should be ready by the time everyone is through eating. Put a little bit of cold river water in the two middle buckets and then pour in the hot wash water until the right temperature is reached.
Knowing the purpose of each bucket helps. The second bucket does not work very well if there is a lot of food waste in it. So the first bucket is used to get rid of most of the food waste. If the plates have a lot of grease or syrup the cold water in the first bucket may not work well and you may want to add some hot water to it. For a small group or a meal where the dishes are not very dirty the first bucket may not be needed. The Park Service recommends a capful of bleach for the fourth bucket, less if the bucket is not very full. This chlorinates the water. Chlorine is a contact disinfectant which requires time to work. It also does not work as well if there is soap in the water so the third bucket is used to remove the soap. A lot of dirt in the water also can reduce effectiveness so avoid getting a lot of silt in this bucket or increase the amount of bleach. Old bleach is not as effective so you may need adjust the amount of bleach a bit. It is possible to quickly run a dish through the first three buckets without letting go of the dish but for the fourth bucket you will want to let go of the dish so it has enough contact time with the chlorinated water. The air drying is important since it gives more time for the chlorine to work and then to outgas and most pathogens do not survive long outside of moist conditions but sometimes you may need to use a towel to dry dishes in order to pack up.
Now all the dishes have been washed and they are air drying in a dish hammock but the wash buckets still need to be cleaned. First, remember somewhere in this process to grab a sponge and dip it into the fourth bucket with chlorinated water and wipe down the tables and any other food preparation surfaces. Then a reverse wash system is used to clean the wash buckets. Get a strainer and the first bucket and stand in the river and carefully pour the water out of the bucket through the strainer into the river (having two people helps with this). This bucket should have most of the food particles and there probably will be some left in the bucket. Replace the first bucket and then pour the water from the second bucket into the first bucket, the water from the third bucket into the second bucket and the water from the fourth bucket into the third bucket. Now take the first bucket and pour the water through the strainer into the river. Repeat until all of the buckets have rinsed with chlorinated water. There should be less food particles in the water poured through the strainer as you go through this process and you will not need to be as careful as with the first bucket. Shake all the food particles from the strainer into the garbage. Describing this is a lot harder than actually doing it.
Check the kitchen to make sure everything is secured and the stove closed. Make sure the valve to the propane tank is turned off since just relying on the valves for the burners may mean a small amount of propane leaking out all night.
To see a handout put together by Matt Walburger, National Park Service Public Health Program Officer, on food storage and management, check out the two page Public Health River Guide.
Here's a generic list of Kitchen items, courtesy of Roger Whyman:
Large NRS Dry Vault
68 x 21 Aluminum Table
Roll up table
MSR Outfitter Wing, 200 sq. ft.
10 x 10 scrim cloth kitchen floor
2 burner Camp Chef stove, 20K btu x 2
3 burner Partner stove, 10K btu x 3
Single burner, 55K btu
26 x 14 Griddle
12 in. cast iron skillet
10 in. hard anodized aluminum skillet
8 in. skillet
12 in. flat bottom Wok type skillet
2-12 in. hard anodized alum. dutch oven
10 qt. stainless stock pot
6 qt. stainless stock pot
2 qt. aluminum pot
1.5 qt. aluminum pot
Stainless mixing bowl
14 cup coffee pot
4 small bowls
4 plates
8 in. knife
6 in. knife
5.5 in. knife
3 in. knife
Food scissors
Large cutting board
Small cutting board
Large flexible cutting mat
4 butter knives
8 forks
8 spoons
28 oz. measuring cup with lid
1 cup measuring cup
Measuring cups
Measuring spoons
2 spatulas
2 Serving spoons
2 slotted serving spoons
Pasta scoop
Rubber scraper
Wisk
Peeler
Can opener
Tongs
Grater
Cork screw
Burner top toaster
2 dish towels
2 hand towels
Paper towels
2 Hot pads
Leather gloves
Aluminum foil
Numerous assorted spices
Hand lotion
Hand sanitizer
Toothpicks
Matches
Aluminum foil
Small zip lock baggies
Qt size zip lock baggies
Sugar
Olive oil
Dry coffee creamer
4 galvanized wash tubs
Dish water strainer
Dish soap
Bleach
Dish rags
Dish scraper
Numerous scrubbies, one with handle
2 small dish drying bags
1 large dish drying bag
1 dish drying hammock
Propane
There's much discussion of how much propane to take on a trip. The variabilities include the number of people, length of trip and time of year. Sean Davis (Thanks Sean!) has put together the following table on propane use. This WIKI recomends that a group of 16 folks might want to bring three 5-gallon (20 pound) tanks for a 16 day summer trip, and 5 tanks (20 pound) for a 30 day winter trip. This is a little on the overkill side, but better to have too much vs. not enough!
| Propane For Camping/Boating – Use Rates (Full Power)* | |
| Burn Rate | |
| Partner Blaster | 120,000 BTU’s/hr |
| Woodland Power Stove | 60,000 BTU’s/hr |
| Partner 6 Burner Stove | 60,000 BTU’s/hr |
| Partner 4 Burner Stove | 40,000 BTU’s/hr |
| Coleman 2 burner | 20,000 BTU’s/hr |
| Coleman 2 Mantle Lantern | 5,000 BTU’s/hr |
| Coleman Northstar Lantern | 4,000 BTU’s/hr |
| Capacity | |
| 20 lb Propane Tank | 428,000 BTU’s |
| 10 lb Propane Tank | 214,000 BTU’s |
| 1 lb Propane Tank | 21,400 BTU’s |
| Burn Time (approximate) | |
| Partner Blaster on 20 lb tank | 3.5 hours |
| Partner Blaster on 10 lb tank | 1.75 hours |
| Partner Blaster on 1 lb tank | 9-10 minutes |
| Woodland Power on 20 lb | 7 hours |
| Woodland Power on 10 lb | 3.5 hours |
| Woodland Power on 1 lb | 20 minutes |
| Partner 6 burner on 20 lb tank | 7 hours |
| Partner 6 burner on 10 lb tank | 3.5 hours |
| Partner 6 burner on 1 lb tank | 20 minutes |
| Partner 4 burner on 20 lb tank | 10.5 hours |
| Partner 4 burner on 10 lb tank | 5.25 hours |
| Partner 4 burner on 1 lb tank | 30 minutes |
| Coleman Stove on 20 lb | 21 hours |
| Coleman Stove on 10 lb | 10.5 hours |
| Coleman Stove on 1 lb | 1:05 |
| Coleman Northstar on 20lb | 105 hours |
| Coleman Northstar on 10 lb | 50 hours |
| Coleman Northstar on 1 lb | 5 hours |
| Coleman 2 Mantle on 20lb | 84 hours |
| Coleman 2 Mantle on 10 lb | 42 hours |
| Coleman 2 Mantle on 1 lb | 4 hours |
| *All times are approximate | |
Click here to return to The Food Pack page.
Click here to return to The Kitchen page.
Click here to return to The Pre-Trip Planning page.


